


Merchant
Portal Guides
Customers
Update an Existing Customer's Payment Method
Keeping your customers’ payment information up to date helps ensure smooth, uninterrupted processing. Follow these steps to add a new card to an existing customer.
- Log in to the Sola Merchant Portal.
- In the left navigation menu, click Customers.
- Find the customer whose payment method you want to update and click their name to open their profile.
- In the panel on the right, select the Payments tab.
- Click Add Card and enter the new card information.
- Save the new card.
- (Optional) Set the new card as the default payment method and delete the old one if no longer needed.
Update a Customer’s Credit Card Expiration Date
If the card number stays the same but the expiration date changes, you can update it in just a few clicks.
- Log in to the Sola Merchant Portal.
- Click Customers on the left menu.
- Select the customer whose expiration date needs updating.
- In the right-side panel, open the Payments tab.
- Click the pencil icon (Edit) in the top-right corner.
- Update the Exp Date field.
- Click Save.
Create a New Customer
You can add customer profiles manually whenever you need to store information, save payment methods, or set up schedules.
- Log in to the Sola Merchant Portal.
- Open the Customers tab on the left.
- Click + New Customer in the top-right corner.
- In the pop-up, click Expand to reveal all available fields.
- Enter the customer’s details in the General and Payment Method sections.
- If needed, add a Recurring Schedule. (This is optional and can be added later.)
- Click Save.
Import Customers
If you’re onboarding multiple customers at once, importing them via spreadsheet is the quickest option.
- Log in to the Sola Merchant Portal.
- Click Customers on the left.
- Click the three dots next to + New Customer and choose Upload Customers and Schedules.
- On the new page, click Download to get the required spreadsheet template.
- Fill in the customer details in the spreadsheet.
- Do not change the column names.
- Only fill out the fields you want imported.
- Review the instructions on the Instructions tab if needed.
- Drag or upload your completed file into Upload File.
- Review your entries on the Uploaded Customers screen.
- If everything looks correct, click Upload Data.
After uploading, your new customers will appear in the Customers tab.
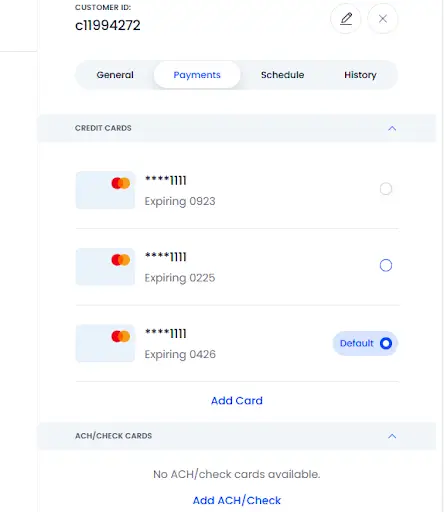
Update a Customer’s Default Payment Method
When a customer has multiple stored payment methods, you can choose which one should be used by default.
- Log in to the Sola Merchant Portal.
- Click Customers.
- Select the customer whose default payment method you want to update.
- In the right-side panel, open the Payments tab.
- Click the circle to the right of the payment method you want to set as default.
- Confirm the change when prompted.
- The selected method will now appear as the default on the customer’s profile.
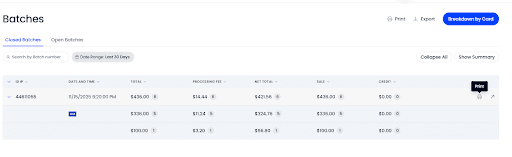
Batches
Find and Export Batch Details (Transactions or Batch Summary)
You can view and export batch details directly from the Sola Merchant Portal.
- Export Transactions Within a Batch
- Log in to the Sola Merchant Portal.
- Click Batches in the left navigation menu.
- Adjust the Date Range if needed.
- Click the batch you want to expand its details.
- On the right-hand side of the expanded batch, click View batch transactions.
- A new tab will open showing all transactions within that batch.
- Click Export in the top-right corner to download an Excel file.
Export a Batch Summary
- If you want only the summary, not individual transactions:
Option A — Print a Single Batch Summary
- Expand the batch and click Print (available only when viewing a single batch).
Option B — Export All Batch Summaries on the Page
- On the main Batches screen, apply your filters or date range.
- At the top-right of the page, click Export (beside the “Breakdown by Card” button).
This will export all batch summaries currently loaded on the page into Excel.
Transactions
Run a New Transaction
- Log in to the Sola Merchant Portal.
- Click Transactions in the left navigation menu.
- In the top-right corner, click + New Transaction.
- Enter the card information, transaction amount, and cardholder details.
Click Process to complete the transaction.
Save a Card Without Charging It
Use this option when you want to securely store a card for future use without running a payment.
- Go to Transactions.
- Click + New Transaction.
- In the Transaction Type dropdown, select Save.
- Enter the card and cardholder information.
Click Process to save the card to the customer’s profile.
Set Up a Transaction for a Later Date
- Go to Transactions.
- Click + New Transaction.
- Enter the required transaction details (amount, transaction type, and card information).
- In the Billing Information section, enter at least a company name, first name, or last name.
- Click Schedule in the bottom-right corner.
- Enter a name for the scheduled payment and choose the date you want it processed.
Click Schedule Payment.
Process a Full Refund
If the transaction has already batched, follow these steps. If it has not batched, use Void instead.
- Navigate to Transactions.
- Locate the transaction using the Reference Number or filters.
- Click the transaction to open its details.
- Click the blue action button in the bottom-right corner.
- Select Refund → Full Refund.
- Confirm the amount and choose whether to send a receipt.
Click Refund.
Process a Partial Refund
- Navigate to Transactions.
- Search for and select the transaction.
- Click the blue action button in the bottom-right corner.
- Choose Refund → Partial Refund.
- Enter the amount you want to refund.
- Choose who should receive a receipt.
Click Refund.
Process a Void
Voids apply only to transactions that have not yet batched.
- Go to Transactions.
- Search for and select the transaction.
- Click the blue action button in the bottom-right corner.
- Select Void.
Confirm by selecting Void Transaction.
Capture an Auth-Only Transaction
- Go to Transactions.
- Scroll right to locate the Command column.
- Click Command and select CC:AuthOnly to filter.
- Click the transaction you want to capture.
- Click the blue action button.
- Select Capture and confirm the amount.
Click Capture.
Issue or Redeem Gift Card Funds
- Go to Transactions.
- Click + New Transaction.
- For Transaction Type, choose:
- Gift:Issue to load funds
- Gift:Redeem to redeem funds
- Enter card details, amount, and any optional cardholder information.
Click Process.
Add Columns to the Transactions View
Customize your view based on what’s most helpful.
- Go to Transactions.
- Click Columns on the right side of the screen.
- Check or uncheck the columns you want to show or hide.
Click Done.
Custom Filter Transaction Search
- In Transactions, click + Add Filter.
- Select the field you want to filter by (e.g., Reference Number).
- Enter the value.
- If the Disable Date Range checkbox is available for that field, check it as needed.
Click Done.
Expanding the Date Range
- Go to Transactions.
- Click the Date Range selector.
- Choose Custom.
- Select or type in the date range you want to view.
Click Apply.
Filter Based on Any Column
- Go to Transactions.
- Use the horizontal scroll bar to find the column you want.
- Hover over the column header to activate the filter field.
- Type the value you want to filter by.
Run a New Gift Card or Payment Transaction (Quick Reference)
For convenience, both gift card and standard payment transactions are accessible from the + New Transaction button.
- Gift:Issue → load funds
- Gift:Redeem → redeem funds
Sale / Auth / Save → standard transaction options
Recurring Schedules
Set Up a Recurring Payment
- Log in to the Sola Merchant Portal.
- Click Recurring Schedules in the left navigation menu.
- Click + New Customer on the right side of the screen.
- Fill in the required fields, including:
- Start date
- Payment amount
- Frequency
- End date (if applicable)
- Review your details.
Click Save to begin the recurring schedule.
Find a Recurring Payment
- Navigate to Recurring Schedules.
- At the top of the table, you’ll see column headers such as Recurring ID, Schedule Name, Customer Name, and Date Created.
- Click the header you want to search by.
- Enter the information you know (e.g., customer name, schedule name).
- Matching schedules will appear as you type.
Change a Recurring Schedule’s Payment Method
- Go to Recurring Schedules.
- Click the schedule you want to update.
- In the Schedule section on the right, click the pencil icon to edit.
- Scroll to Payment Method.
- Select the payment method you want to use for future charges.
Click Save.
Change Retry Attempts for a Recurring Schedule
If a payment fails, you can control how many times and how often the system retries it.
- Open Recurring Schedules.
- Select the schedule you want to edit.
- Click the pencil icon to edit the schedule.
- Scroll to the retry settings:
- How many times do you want to retry if a transaction fails?
- How many days do you want to wait between retries?
- Update these values based on your needs.
Recommended Settings
- We recommend 3 retry attempts, spaced 3 days apart.
- Keep in mind: a high decline ratio can negatively affect a merchant account.
- To protect the account’s health, retries should be kept to a minimum.
Click Save.
Delete a Recurring Schedule
- Go to Recurring Schedules.
- Locate the schedule you want to remove.
- Click the three dots next to the schedule name.
- Select Remove Schedule.
- Confirm the deletion.
Note: Deleting a schedule stops it from running, but past payments still appear on the customer’s account.
Stop (Deactivate) a Recurring Schedule
Use this option when you want to stop future payments but keep the schedule record intact.
- Go to Recurring Schedules.
- Find the active schedule.
- Click the three dots next to the name.
- Select Deactivate Schedule.
- The schedule will stop running immediately.
Delete ALL Recurring Schedules
- Navigate to Recurring Schedules.
- Click the checkbox to the left of the Recurring Schedule column header.
- This will select all schedules.
- Click Delete in the bottom-right corner.
- Confirm deletion.
PaymentSITE
Add a Description Field
- Go to Settings in the bottom-left corner.
- Select Gateway Settings, then open the PaymentSITE tab.
- Click the pencil icon next to your PaymentSITE URL to edit.
- In Manage Layout, find the Transaction Details section.
- Click the + icon to add a field.
- Select Description from the list.
- (Optional) Click the pencil icon to rename the field.
Click Publish to save your changes.
Add a Dropdown Field
- Go to Settings → Gateway Settings → PaymentSITE.
- Click the pencil icon next to the URL to edit.
- In Manage Layout, locate Transaction Details.
- Choose a Custom field (e.g., Custom02 or Custom03).
- Click the Dropdown icon.
- Enter your Display Value (what the customer sees) and Reporting Value (what is sent on the backend).
- Click Add Additional Option to add more values.
- Publish your changes.
Add Checkboxes
- Go to PaymentSITE settings and open the editor.
- In Manage Layout, click the + icon in Transaction Details.
- Select a Custom field.
- Click the Checkbox icon.
- Expand the field using the arrow and add your display and reporting values.
- Add more options as needed.
- Publish your changes.
Add an Electronic Transfer Fee (ETF)
- Go to PaymentSITE settings and open the editor.
- Navigate to General Settings.
- Open Electronic Transfer Fee.
- Check CC Percent and/or ACH Percent.
- Enter the percentage you want to apply.
- Publish your changes.
Make a Field Required
- Open the PaymentSITE editor.
- In Manage Layout, locate the field you want to require.
- Click the star icon next to the field name — blue means required.
- Publish your changes.
Add a New Section (e.g., Shipping Information)
- Open the PaymentSITE editor.
- In Manage Layout, click Add a New Section (top right).
- Check Shipping Information or another available section.
- Edit or remove fields within that section as needed.
- Publish your changes.
Add a Tab to Your PaymentSITE
- Open the PaymentSITE editor and go to General Settings.
- Open Account Tabs.
- Check the box to enable tabs.
- Click Add Tab.
- Enter a Title and Body for your new tab.
- Publish your changes.
Change Your PaymentSITE Header
- Go to PaymentSITE and open the editor.
- Hover over the header text at the top of the editor and click the pencil icon.
- Update the header name.
Click Save, then Publish.
Change the Theme
- Open the PaymentSITE editor.
- Go to General Settings.
- Expand Themes.
- Choose Grey or Green.
- For the Grey theme, you can also set a background color.
- Publish your changes.
Add a New Field
- Open the PaymentSITE editor.
- In Manage Layout, choose the section where the new field should go.
- Click the + icon next to the section name.
- Select a predefined field or choose a Custom field.
- Click the pencil icon to rename the field if desired.
- Publish your changes.
Edit a Field Name
- Open the PaymentSITE editor.
- In Manage Layout, locate the field you want to rename.
- Click the pencil icon next to the field.
- Update the field label.
- Publish to save the update.
Find Your PaymentSITE URL
- Go to Settings → Gateway Settings → PaymentSITE.
- Your URL appears at the top of the page.
- Click the URL to view your PaymentSITE.
- Click the pencil icon to edit it.
Add a Logo to Your PaymentSITE
- Open PaymentSITE settings and click the pencil icon to edit.
- In the right-hand panel, find PaymentSITE Logo.
- Upload an image by dragging it in or selecting it from your files.
- Publish to apply the update.
Remove a Field
- In the PaymentSITE editor, go to Manage Layout.
- Find the field you want to remove.
- Click the trash can icon.
- Publish your changes.
Remove the “Required” Setting from a Field
- In Manage Layout, locate the required field.
- Click the star icon to turn it from blue to grey.
- Publish your changes.
Make “Amount” a Dropdown
- Open the PaymentSITE editor.
- In Manage Layout, find the Amount field.
- Click the Dropdown icon.
- Enter the Display Value and Amount for each option.
- Add additional amounts as needed.
- Publish your changes.
Add Terms and Conditions
- Open the PaymentSITE editor.
- Go to General Settings.
- Expand Terms and Conditions.
- Enter your Title and Body text.
- (Optional) Enable the Display agree checkbox and customize the label.
- Publish your changes.
Settings & User Management
Add a New User
You must be an admin to add users to your account.
- Log in to the Sola Merchant Portal.
- Go to Settings (bottom-left corner).
- Select Portal Settings → User Management.
- Click + New User.
- Enter the user’s email and assign a role.
- Click Create and Invite User.
- The user will receive an email to set their password and MFA.
- If they already have a Sola Merchant Portal login, the new account will appear automatically under their profile dropdown.
Remove a User
Admin-only action.
- Go to Settings → Portal Settings → User Management.
- Find the user you want to remove.
- Click the trash can icon next to their name.
- Confirm removal.
Change a User’s Role
Admin-only action.
- Navigate to Settings → Portal Settings → User Management.
- Click the pencil icon next to the user’s name.
- Select the new role.
- Save your changes.
Change Your Default Account
If you manage multiple accounts, you can choose which one appears first when you log in.
- Go to Settings → User Settings → Account Dropdown Order.
- Find the account you want as your default.
- Drag it to the top of the list.
Click Save Changes.
Enable Electronic Transfer Fee (ETF)
- Go to Settings → Portal Settings.
- Under New Transaction Settings, open Electronic Transfer Fee.
- Enable:
- CC Percent for credit card transactions
- ACH Percent for ACH transactions
- Enter the percentage you want to apply.
- Click Save Changes.
Enable AVS on Your Account
AVS (Address Verification System) helps reduce fraud by checking the billing address provided during a transaction.
- Go to Settings → Gateway Settings → Fraud Settings.
- Open AVS & CVV Settings.
- Select the AVS/CVV options you want to apply.
- Click Save Changes.
Note: AVS requires the customer’s street address and ZIP code to be passed with each transaction.
Reset Your Password
- Visit the login page: https://portal.solapayments.com/login
- Click Forget my password.
- Enter the email associated with your account.
- Check your inbox for a verification code from Donotreply@solapayments.com.
- Check spam/junk if you don’t see it.
- Enter the code and set your new password.
- Save your changes.
- Repeat these steps if your password is forgotten again.
Register for the Sola Merchant Portal
Only needed if you haven’t created a login for your email before.
- Go to https://portal.solapayments.com/register
- Enter the email associated with your merchant account.
- Create a password.
- Must include: one uppercase letter, one special character, and one number.
- Enter the email confirmation code.
- Set up MFA:
- Software MFA (Authenticator app)
- SMS MFA (text message)
- Enter the MFA code to complete registration.
- Log in using your new credentials.
Generate an API Key
- Go to Settings → Gateway Settings → Key Management.
- Click Create a Key.
- Choose the Type (API or IFields).
- Add a Description or custom name.
- Assign the Admin role.
- Click Create and View.
- Copy and save the key somewhere secure — you will not be able to view it again.
- Click Done.
Developers can reference: https://docs.solapayments.com/
Upload a Logo for Receipts
- Go to Settings → Portal Settings → Logo Management.
- Click Upload Logo to choose an image.
- Select which receipt types should display the logo.
- Click Save Changes
.
Change the Transaction History Load Limit
- Navigate to Settings → User Settings → Transaction History.
- Open the Default Load Limit dropdown.
- Choose the range you prefer (e.g., All).
- Click Save Changes.
Reports
Create a Report
- Log in to the Sola Merchant Portal.
- Click Reports in the left menu.
- Select a date range from the Select Date dropdown.
- Choose a preset range (e.g., “Last 90 Days”) or select Custom for older dates.
- Under View/Sort By, choose how you want the report organized (e.g., Date, Reference Number, Amount).
- Use the Transaction Type dropdown to include or exclude certain transaction types.
- Use the Transaction Status dropdown to filter for Approved or Declined transactions.
- Your report will update automatically based on your selections.
Create a Customer Token Report
- Go to Reports.
- Scroll to the bottom-right corner and open the Other Reports dropdown.
- Select Customers, Payment Methods and Schedules.
- A CSV file will download to your device.
- Open the CSV to view customer details, saved tokens, and any associated recurring schedule information.
Send Payment Request
The Send Payment Request tool allows you to create a custom payment link you can email or text to your customer.
Create and Send a Payment Request
- Log in to the Sola Merchant Portal.
- Click Send Payment Request in the left navigation menu.
- Open the Billing Information and Transaction Details sections to enter the customer’s details.
- (Optional) Attach an invoice using the Attach an Invoice section.
- Once the request is set up, choose one of the following actions at the bottom of the screen:
- View — preview the request as it will appear on your PaymentSITE
- Email — send the request by email
- Text — send the request by SMS
Sending by Email
- Click Email.
- Enter the customer’s email address.
- Customize the company name, subject line, and email body as needed.
- Important: Make sure the body still contains [link] — this is required for the payment link to generate correctly.
Click Send Email.
2-Factor Authentication (MFA)
You can use the Authenticator.cc browser extension to set up multi-factor authentication (MFA) for your Sola Merchant Portal account. This provides an added layer of security each time you log in.
Download and Install the Authenticator.cc Extension
- Open your preferred browser (Chrome, Edge, Firefox, etc.).
- In a new tab, go to authenticator.cc.
- Click Add to Chrome.
- If you’re using Edge or Firefox, click the blue down arrow to see those options.
- You’ll be taken to the appropriate browser extension store.
- Click Add (or Add Extension) to install the tool.
Once installed, click the extension icon and pin it to your browser toolbar for easy access.
Add Your Sola MFA to the Authenticator
- Click the Authenticator.cc extension icon.
- Select the pencil icon in the top-right corner to enter edit mode.
- Click the + sign to add a new MFA entry.
- Choose Manual Entry.
- Copy your long alphanumeric MFA Secret Key from the Sola setup screen into the Secret Key field.
- In the Issuer field, enter a name—
- We recommend: Sola Merchant Portal.
- Click OK to save your MFA entry.
Your authenticator will now generate time-based codes you’ll enter whenever you log in to the Sola Merchant Portal.
Overflow Items
Send or Print a Receipt
- Log in to the Sola Merchant Portal.
- Click Transactions in the left navigation menu.
- Click + Add Filter to search by reference number, last four digits of the card, cardholder name, or invoice.
- If the transaction is older, select Disable Date Range.
- Select the transaction from the results.
- In the top-right corner of the transaction details panel, click the three dots.
- Choose one of the following:
- Download
- View Transaction Receipt
Run a Gift Card Transaction (Standalone Version)
Although this was covered under Transactions, here is the self-contained version for clarity in your organization plan.
Issue Funds to a Gift Card
- Go to Transactions.
- Click + New Transaction.
- For Transaction Type, select Gift:Issue.
- Enter the card information, amount, and any optional cardholder details.
- Click Process.
Redeem Funds from a Gift Card
- Go to Transactions.
- Click + New Transaction.
- For Transaction Type, select Gift:Redeem.
- Enter the requested details.
Click Process.